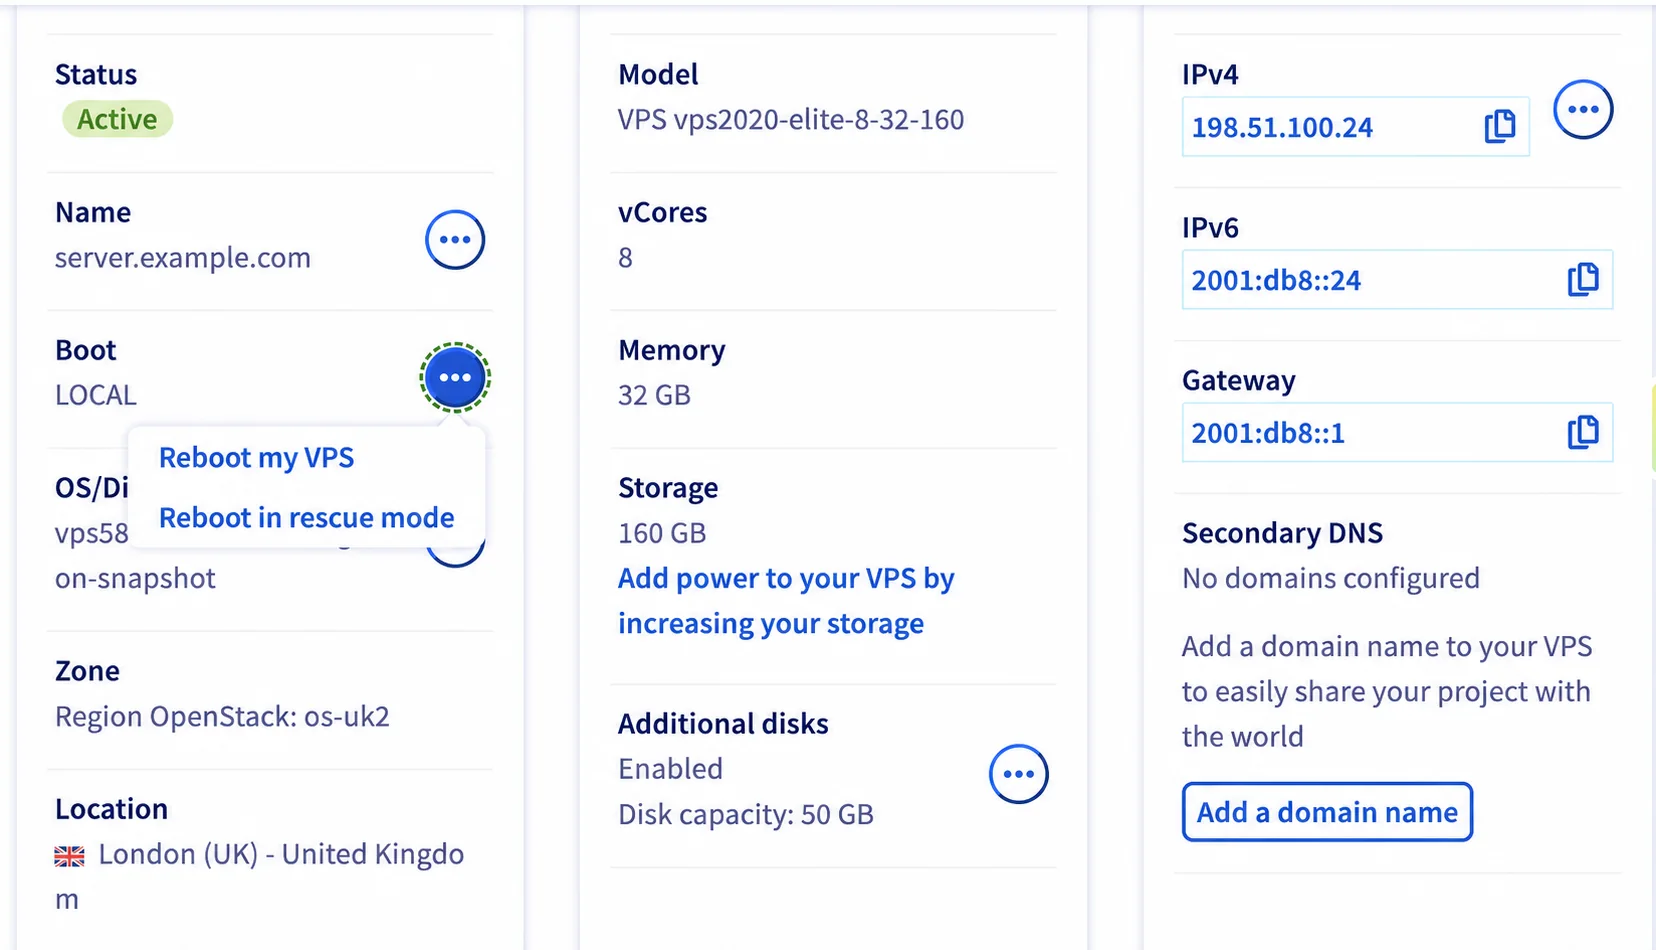
An OVH server can appear completely dead even when its data is still intact. A damaged bootloader, an incorrect /etc/fstab entry, a full root filesystem, a failed kernel update or filesystem corruption can prevent the installed operating system from starting. Rebooting repeatedly rarely explains which one happened.
OVH rescue mode gives you a separate temporary Linux environment. Because that environment does not depend on the damaged installation, you can inspect the original disks, read logs, copy important data and repair the startup path. The difficult part is not opening rescue mode. It is identifying the correct storage layout and making the smallest safe change.
This guide covers Linux OVH VPS and dedicated server recovery. Device names and layouts vary, so treat every command as a method to understand your server rather than a list to paste without reading the output.
Work only on infrastructure you are authorized to administer. Before any write operation, confirm the device, filesystem, RAID and LVM layout. If the data is valuable, preserve it before attempting repair.
What OVH Rescue Mode Actually Does
Normal local boot loads the operating system from your server disk. Rescue mode instead starts a temporary operating system supplied through OVHcloud's recovery environment. Your installed disk remains attached, but it is not automatically treated as the active root filesystem.
This separation makes rescue mode useful when:
- The OVH VPS no longer responds after an update or reboot.
- SSH is unavailable because networking, firewall or access configuration is broken.
- GRUB, the initramfs or a kernel package is damaged.
- A filesystem error prevents the root volume from mounting.
- An incorrect filesystem entry sends the machine into emergency mode.
- The root filesystem is full and services cannot start.
- You need to recover files before rebuilding the server.
- You need an independent environment to inspect disks or software RAID.
Starting OVH rescue mode does not repair the installed system and does not prove the underlying disks are healthy. It creates an independent place from which an administrator can diagnose the actual failure.
Check Whether This Is an OVH Service Incident First
The keyword data shows that many people searching for an OVH server down also search for OVH server status. These are different situations. If several OVH services, the control panel or an entire region appears unavailable, a provider incident may be more likely than corruption inside one server.
Before changing the boot mode, record the time and test the scope:
- Can the public address be reached from more than one external network?
- Does the OVH control panel show the VPS or dedicated server as running?
- Does the provider console or KVM display a boot error?
- Are other servers in the same account or region reachable?
- Did the failure begin immediately after an operating-system change?
If the rescue environment is reachable while local boot is not, that is strong evidence that the network path and virtual or physical server are available. The fault is then more likely to be inside the installed operating system, disk layout or boot configuration.
Start OVH Rescue Mode from the Control Panel
For an OVH VPS, open the VPS in the control panel and find the Boot setting. Open its action menu and select Reboot in rescue mode , as shown in the screenshot. Confirm the operation and allow the rescue system to start. OVHcloud sends or displays the connection method associated with the service and account configuration.
Dedicated server interfaces can present the boot choice differently. Select the customer rescue system rather than local disk boot, apply the boot change and restart the server. Do not reinstall the operating system. A reinstall is a separate destructive workflow.
Connect with the rescue credentials or approved SSH key:
ssh root@198.51.100.24The address above is reserved for documentation. Substitute your own server address. Once connected, capture an initial snapshot:
date -u
hostnamectl 2>/dev/null || hostname
uname -a
ip -br address
findmnt /
lsblk -e7 -o NAME,MAJ:MIN,SIZE,FSTYPE,TYPE,MOUNTPOINTS,UUID,MODEL
blkid
fdisk -l
Save this output privately. It establishes which device hosts the temporary rescue root and which devices belong to the installed server.
Identify the Installed System Disk Before Mounting Anything
On many OVH VPS rescue sessions, the small rescue environment appears as one disk and the original VPS disk appears as another, often /dev/sdb . A dedicated server may use /dev/sda , NVMe names such as /dev/nvme0n1 , software RAID devices such as /dev/md2 , or logical volumes under /dev/mapper/ . Never assume a device name from a tutorial.
Use the evidence together:
findmnt /lsblkblkidfdisk -lcat /proc/mdstatpvs,vgsandlvsreveal LVM physical volumes, groups and logical volumes.
identifies the device currently providing the rescue root.
shows size, filesystem, device relationships and existing mount points.
shows filesystem types, UUID values and labels.
shows partition tables and disk geometry.
reveals assembled Linux software RAID arrays.
A plausible Linux root filesystem usually contains directories such as etc , var , usr , home and boot . Size alone is not enough. A server can have separate root, boot, home and application volumes.
Mount the Suspected Root Filesystem Read-Only First
A read-only mount lets you verify the contents without intentionally changing filesystem data. Create a neutral mount point and substitute the device identified from your own output:
mkdir -p /mnt/system
mount -o ro /dev/sdb1 /mnt/system
findmnt /mnt/system
ls -la /mnt/system
cat /mnt/system/etc/os-release
If the expected operating-system directories are present, you probably found the root filesystem. Check whether separate filesystems are declared:
cat /mnt/system/etc/fstab
ls -lah /mnt/system/boot
du -xhd1 /mnt/system 2>/dev/null | sort -h | tail -20
Do not modify fstab merely because device names in rescue mode look different. The installed system may use UUID values, labels, RAID or LVM names that resolve correctly during normal boot. Compare its entries with blkid and the actual storage layout.
If the read-only mount fails, record the exact error. “Wrong filesystem type”, “bad superblock”, “unknown filesystem” and “device is busy” point to different problems. Do not respond to every mount error by running an automatic repair.
Diagnose Why the OVH Server Will Not Boot
The goal is to connect the last successful change or boot event to the current failure. Start with evidence that does not alter the disk.
Read the previous boot journal
If persistent systemd journals exist, read them directly from the mounted installation:
journalctl --directory=/mnt/system/var/log/journal --list-boots
journalctl --directory=/mnt/system/var/log/journal -b -1 -p warning..alert
journalctl --directory=/mnt/system/var/log/journal -b -1 | tail -250
Look for the first meaningful failure rather than the last cascade of stopped services. Filesystem mount failures, missing UUID values, kernel panics, unavailable root volumes and initramfs errors are more useful than services that failed only because the root cause occurred earlier.
Check text logs and package history
tail -200 /mnt/system/var/log/syslog 2>/dev/null
tail -200 /mnt/system/var/log/messages 2>/dev/null
tail -200 /mnt/system/var/log/kern.log 2>/dev/null
tail -100 /mnt/system/var/log/apt/history.log 2>/dev/null
tail -100 /mnt/system/var/log/dnf.log 2>/dev/null
tail -100 /mnt/system/var/log/yum.log 2>/dev/null
Package history can show an interrupted kernel, GRUB, initramfs or storage update. Log timestamps also help distinguish an old warning from the incident that caused the current outage.
Check capacity and inodes
df -hT /mnt/system
df -ih /mnt/system
du -xhd1 /mnt/system/var 2>/dev/null | sort -h | tail -20
A full root filesystem can stop SSH, package management, databases and logging. Do not delete files blindly. Identify whether the growth came from application logs, a database, a failed backup, temporary files or deleted files that were held open before the crash.
Handle Filesystem, LVM and RAID Problems Safely
Storage repair is the point at which a recoverable outage can become permanent data loss. Preserve important data first whenever the filesystem can still be read.
Filesystem checks
A filesystem repair tool must target the correct, unmounted filesystem. For ext filesystems, a read-only examination can be requested with:
umount /mnt/system
fsck -n /dev/sdb1
The -n examination does not approve changes. Read its report before choosing a repair. XFS uses different tooling:
xfs_repair -n /dev/sdb1Do not run fsck against XFS, do not run repair against a mounted filesystem and do not force a repair simply because a guide contains the command. OVHcloud's own VPS filesystem guidance also requires the target partition to be unmounted before a consistency check.
LVM volumes
If lsblk shows LVM members, inspect and activate the existing volume groups:
pvs
vgs
lvs -a -o +devices
vgchange -ay
ls -l /dev/mapper
Mount the identified logical root volume read-only. Do not initialize a physical volume or create a new volume group on an existing disk.
Linux software RAID
cat /proc/mdstat
mdadm --examine --scan
mdadm --detail /dev/md2 2>/dev/null
On a dedicated server, degraded RAID can coexist with readable data. Record member state and events before assembly or repair. A forced assembly with the wrong members can select stale data. When array membership is unclear, stop and obtain a disk-by-disk recovery plan.
Recover Important Data Before an Invasive Repair
If the installed filesystem mounts and the data matters, copy the irreplaceable content before rebuilding boot files or repairing metadata. Prioritize application data, databases, configuration, customer uploads, encryption material and a record of the original storage layout.
For a mounted source, rsync can preserve Linux ownership and metadata when the destination supports them:
rsync -aHAX --numeric-ids --info=progress2 \
/mnt/system/home/ backup-user@203.0.113.40:/recovery/server-home/
Both addresses shown in this guide use documentation-only ranges. Substitute an approved backup destination. Database files copied while a database was running may not be transactionally consistent, but during rescue mode the installed database is normally stopped. Even then, preserve the original directory before attempting engine-level recovery.
If reads produce I/O errors or the disk repeatedly disappears, ordinary file copying may worsen a failing device. A block-level image or a tool designed to retry damaged media may be more appropriate. This is especially important on a dedicated server with a suspected physical disk failure.
Repair the Installed System with a Controlled chroot
Use a chroot only after identifying and mounting the correct root filesystem. Remount it read-write only when you are ready to make a specific change and have protected important data:
mount -o remount,rw /mnt/system
mount --rbind /dev /mnt/system/dev
mount --make-rslave /mnt/system/dev
mount -t proc proc /mnt/system/proc
mount -t sysfs sys /mnt/system/sys
mount --rbind /run /mnt/system/run
mount --make-rslave /mnt/system/run
chroot /mnt/system /bin/bash
Inside the installed environment, a repair should match the evidence. Examples include:
- Correcting a confirmed invalid UUID or mount option in
/etc/fstab. - Completing an interrupted package configuration.
- Rebuilding the initramfs after confirming missing storage or filesystem modules.
- Rebuilding the GRUB configuration after confirming its installed files and boot mode.
- Restoring a known-good network configuration after comparing it with OVH service details.
- Removing a small, confirmed set of expendable files from a full root volume.
GRUB repair differs between BIOS and UEFI systems and between distributions. A command that is correct for an Ubuntu BIOS VPS may be wrong for an AlmaLinux UEFI dedicated server with software RAID. Confirm the boot mode, EFI partition, installed distribution and target disk before installing a bootloader.
Exit OVH Rescue Mode and Return to Local Boot
Leave the chroot, flush pending writes and unmount the installed filesystems cleanly:
exit
sync
umount -R /mnt/system
If a recursive unmount reports that a target is busy, use findmnt -R /mnt/system and identify the open shell or process. Do not hide an active mount with a forced restart unless the risk is understood.
In the OVH control panel, change the boot choice from rescue mode back to LOCAL or local disk boot, then restart. This is the usual explanation when an OVH server keeps returning to the rescue environment after a successful repair.
Watch the console during the first local boot. Confirm more than ping:
- The expected kernel and root volume load.
- All required filesystems mount.
- The public network configuration is correct.
- SSH starts and accepts the intended authentication method.
- Web, database and control-panel services recover.
- Disk, RAID and filesystem alerts are clear.
- Backups and monitoring resume after the outage.
Common OVH Rescue Mode Problems
| Symptom | Likely direction | Safe next check |
|---|---|---|
| Rescue works, local boot fails | Installed OS, bootloader, initramfs, filesystem or configuration problem | Read the previous boot journal and console output |
| Original disk does not appear | Wrong service, attachment problem or storage failure | Compare lsblk and fdisk -l with OVH service details |
| Mount reports an unknown filesystem | LVM, RAID, encryption or the wrong partition | Inspect blkid, pvs and /proc/mdstat |
| Filesystem mounts read-only | Explicit read-only mount or filesystem protection after errors | Review kernel output and filesystem state before remounting |
| Server always returns to rescue | Boot target remains set to rescue | Change OVH boot mode back to local disk |
| Local boot succeeds but network is absent | Interface name, address, route or firewall configuration | Compare installed configuration with the rescue network and console |
| Disk produces I/O errors | Storage or physical media failure | Stop unnecessary writes and prioritize data recovery |
When to Stop and Escalate the Recovery
Stop experimenting when the storage layout is not fully understood, filesystem tools report serious damage, RAID members disagree, the disk produces I/O errors or the server contains data that cannot be recreated. Every unsuccessful write can reduce later recovery options.
iServerSupport provides a hands-on Server Crash Recovery Service for infrastructure you already own or rent, including OVH VPS and dedicated servers. An engineer can inspect the rescue environment, map storage, protect recoverable data, repair the startup path and verify the server after local boot. Recovery work is billed at $49 per administrator hour.
If the server is reachable but has another urgent production fault, use Emergency Server Support . For ongoing administration after recovery, see Linux Server Management .
OVH Rescue Mode Questions
What is OVH rescue mode?
It is a temporary recovery operating system that starts independently of the installed server disk. It lets an administrator inspect storage, mount filesystems, copy data and repair a Linux installation that cannot boot normally.
Does rescue mode delete data on an OVH server?
Starting rescue mode does not itself erase the installed disk. Incorrect mounts, repairs, RAID operations or writes can still damage data. Identify every device and preserve important files before making changes.
Why does the server keep booting into rescue mode?
The OVH boot option may still be set to rescue instead of local disk, or the previous restart may not have completed. Unmount the installed filesystems cleanly, change the control-panel boot mode back to LOCAL and restart.
Can rescue mode fix a full root filesystem?
It gives you access to the stopped filesystem so you can identify what consumed the space. Remove only confirmed expendable data or move it to safe storage. Do not delete database files, package state or unfamiliar logs merely to make the server boot.
When should I use an OVH server recovery service?
Use specialist help when the disk layout is unclear, RAID or LVM is degraded, the filesystem holds important data, repeated repair attempts have failed or the server returns to the same boot error. Early evidence preservation usually creates more recovery options than repeated trial and error.
Server not booting or trapped in rescue mode?
Our engineers can diagnose failed boots, protect recoverable data and work through RAID, LVM, filesystem and startup problems.