Running Python frameworks such as Django or Flask behind Nginx demands more than a basic configuration. Users expect HTTPS, browsers enforce TLS 1.2+, and search engines reward those who serve secure traffic. Free certificates from Let’s Encrypt make this achievable. If you’d prefer a fully managed environment including Nginx tuning and SSL monitoring, check out our Linux Server Management service.
Before You Begin – Requirements
-
A registered domain pointing via A + www records to your server
-
An Nginx server block in /etc/nginx/sites-available/your-domain.conf
-
A working Python application using Django or Flask
-
SSH root or sudo access
-
Ensured ports 80/443 open on your firewall
If you have a high-traffic application and want performance tuning included, see our Server Optimization Service.
Step 1: Install Certbot for Let’s Encrypt
Update your repositories:
sudo apt-get updateInstall Certbot and the Nginx plugin (modern method):
sudo apt-get install -y certbot python3-certbot-nginxClone method (not recommended for 2025):
sudo git clone https://github.com/certbot/certbot /opt/letsencryptStep 2: Confirm Nginx Configuration
Open your server block and verify:
sudo nano /etc/nginx/sites-available/iserversupport.comCheck the server_name directive:
server_name iserversupport.com www.iserversupport.com;Validate Nginx and reload:
sudo nginx -t
sudo systemctl reload nginx
📌 Insert screenshot your Nginx server block here.
Step 3: Obtain the SSL Certificate
Run:
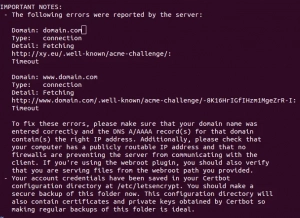
sudo certbot --nginx -d iserversupport.com -d www.iserversupport.comIf IPv6 records exist and fail, remove AAAA records temporarily.
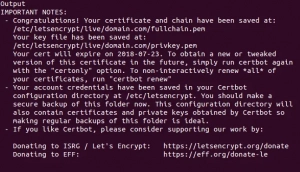
The interactive plugin will configure Nginx and reload automatically.
📌 Insert screenshot success message here.
Step 4: Configure Django / Flask for HTTPS
Django:
In settings.py:
SECURE_SSL_REDIRECT = True
SESSION_COOKIE_SECURE = True
CSRF_COOKIE_SECURE = True
Flask:
app.config.update({
    'SESSION_COOKIE_SECURE': True,
    'PREFERRED_URL_SCHEME': 'https'
})
Update your Nginx proxy block:
proxy_set_header X-Forwarded-Proto $scheme;Step 5: Set Up Auto-Renewal
Let’s Encrypt certificates last 90 days. The package adds a cron job:
Test renewal manually:
sudo certbot renew --dry-runNo errors? You’re good.
For monitoring, consider turning to our Server Security Service.

Troubleshooting Common Problems
|
Symptom |
Cause |
Fix |
|---|---|---|
|
SSL fails, browser shows Connection refused |
Port 443 blocked |
Open port in firewall |
|
DNS still shows HTTP |
server_name mismatch |
Confirm server block matches domain |
|
Large app bundle fails |
Python dependencies |
Optimize with caching & CDN |
|
Renewal fails |
Certbot error |
Verify cron job & DNS records |
Conclusion
Securing Django or Flask with Let’s Encrypt on Nginx is straightforward when you follow the correct steps—from installing Certbot to enforcing HTTPS in your settings. While this guide covers the essentials, we can manage full-stack tuning and SSL maintenance for you through our Linux Server Management or Server Optimization Service.
📷 Image Alt Tags
-
nginx server block configuration for iserversupport.com
-
certbot letsencrypt nginx obtain certificate iserversupport.com
-
django settings secure ssl redirect secure cookies
-
flask application secure session cookie https
-
certbot renew dry run output ssl iserversupport.com
If you want the next blog URL, I’ll hunt down the next one and repeat.

Leave A Comment