How to setup LAMP server on CentOS
LAMP stands for Linux, Apache, MySQL and PHP. These are the packages we use for hosting a website or in other words this are the basic components of a basic webserver suite. Of course, there are alternatives but these are the widely used ones.
First we’ll install and configure Apache.
Apache is the webserveer used in the setup. This package/software handles the HTTP requests send to the server.
We can simply install ‘httpd’ which is the Apache service with yum. Execute the command given below in a terminal.
yum install httpd
After installing, enable the service ‘httpd’ in the common runlevels, so that it will automatically start when the system is rebooted. Use the command given below for this.
chkconfig --level 35 httpd on
You can check this with:
chkconfig --list | grep httpd
We should manually start the ‘httpd’ service after installing.
service httpd start
We can check the httpd status with,
service httpd status
With this httpd should be up and running. Now are going to configure Apache with a website. I’ll show how we can create a test website.
For this purpose, you’ll have to know what a VirtualHost is. It is an Apache directive present in the Apache configuration file that is used to host more than one website in a server. There should be separate VirtualHost for each domain.
Apache configuration file varies with the installation directory. By default if we install httpd with yum, the configuration file location is /etc/httpd/conf/httpd.conf.
We can either add the VirtaulHost (any number) in the Apache configuration file directly or we can create separate .conf file for each domain in the /etc/httpd/conf.d directory and ask Apache to refer the configuration files (.conf) in the said directory with ‘Include’ directive as given below.
Include conf.d/*.conf
With the above given rule, Apache will check configuration file in the /etc/httpd/conf.d directory.
Given below is a simple VirtualHost entry for the domain ‘example.com’.
<VirtualHost *:80>
  ServerAdmin webmaster@example.com
  ServerName example.com
  DocumentRoot /var/www/html
 </VirtualHost>
I’ll explain each directive in the VirtualHost.
<VirtualHost *:80> //This is the opening tab of VirtualHost. The asterisks matches all IP addresses in the server.
ServerAdmin // ServerAdmin directive is used to specify the Email address of the server admin of that website.
ServerName //ServerAdmin directive is used to specify the name of the domain/website.
DocumentRoot // DocumentRoot directive is used to specify the Content directory of the website.
</VirtualHost> // This is the closing tab of VirtualHost.
Now the VirtualHost is setup and we need to upload the contents in the content directory or Document Root.
For this I just uploaded an index.html file int the Document Root (/var/www/html).
To bye pass DNS, I just added the IP of the server in /etc/hosts file in the local machine and tried loading the domain (example.com) in the browser.
vi /etc/hosts
XX.YY.XX.ZZ example.com
Replace XX.YY.XX.ZZ with the IP of the server.
Now load the website in the browser.

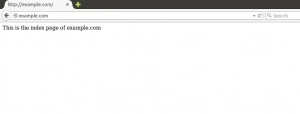
LAMP server setup in CentOS
It worked!
With this basic setup of Web server / Apache is complete.
Now we can deal with installation of PHP for loading PHP files present in the Document Root.
We can simply install PHP with yum.
yum install php php-mysql
Now the PHP files will be parsed and you can see the PHP files in browser. You can test this by creating a simple index.php file in the Documet Root with the code given below.
<?php
phpinfo();
?>
The above given code displays the PHP information.
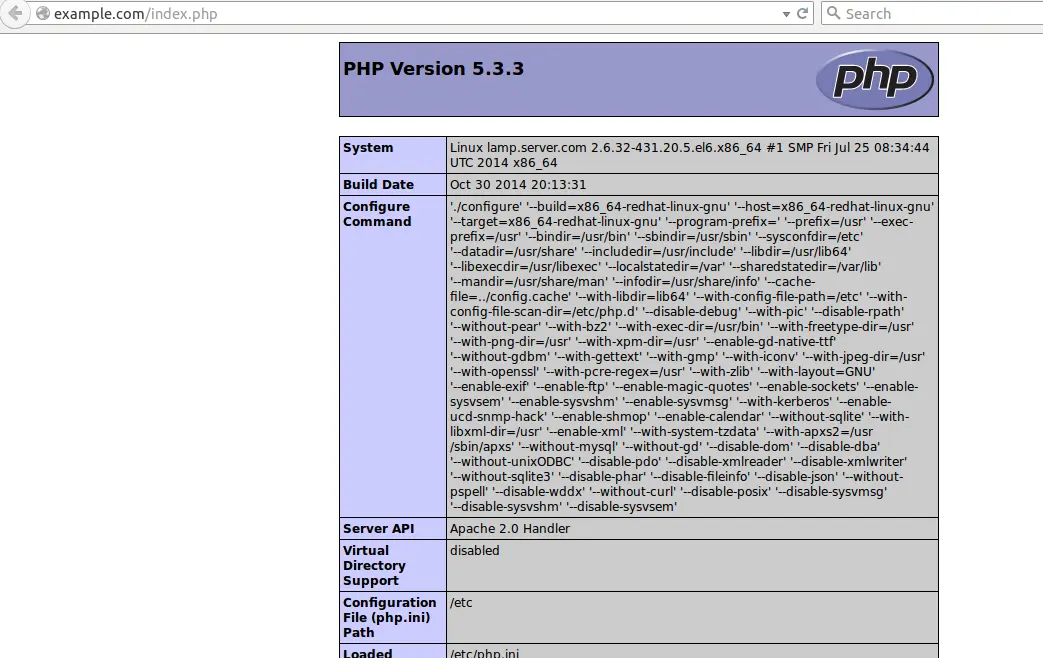
PHP info
You can install necessary PHP modules with yum itself.\
yum install <module name>
You can get the available modules in yum with,
yum search php
With PHP installed we can execute simple scripts. But for bigger websites there need to be a DBMS (database management system) to store and retrieve data. In our setup we are using MySQL as the database.
We can install MySQL with,
yum install mysql-server
This will install MySQL server but if you can check MySQL service (mysqld) status with,
service mysqld status
Output should be like,
mysqld is stopped
This is because, mysqld won’t start with the installation, so we will have to start it manually,
service mysqld start
This will give you the following output.
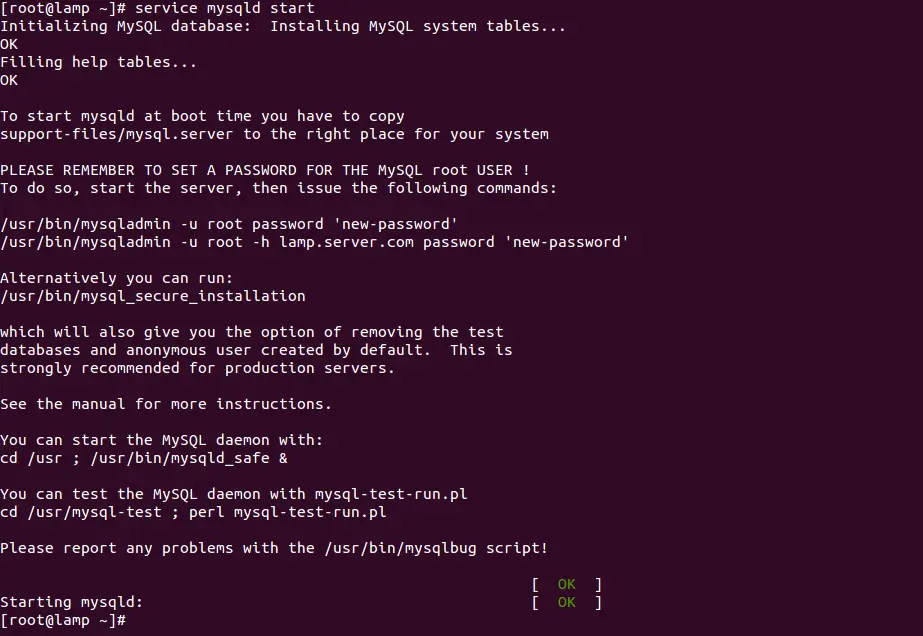
MySQL installation
MySQL service is UP and running now, you can add it in chkconfig for auto start after reboot,
chkconfig --level 35 mysqld on
Now, we’ll have to set root password for MySQL. Otherwise it’ll be accessible remotely without any authentication. Fore this you can use, the inbuilt script,
/usr/bin/mysql_secure_installation
This will prompt current password, since this is a new installation just hit ‘Enter’.
When new password is prompted, Enter the desired MySQL root password.
This script will also prompt the following questions as shown in the screenshot. You can press ‘Y‘ for all the questions for keeping MySQL secure.
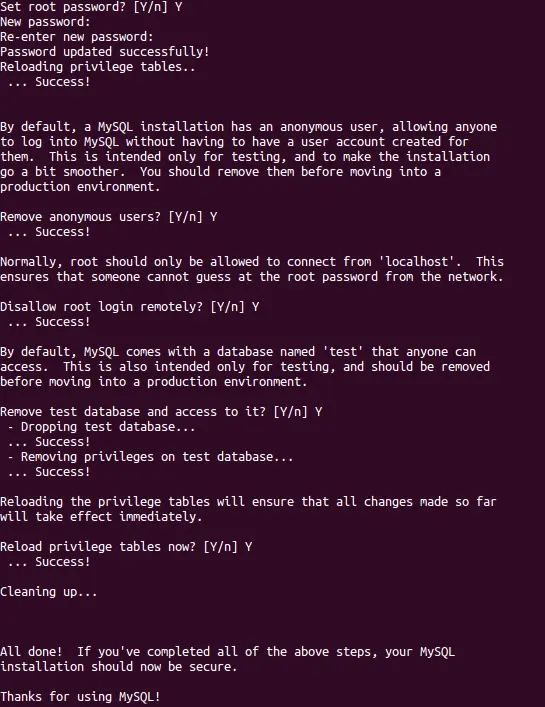
Setting MySQL password
This marks the installation of MySQL and with this the complete LAMP stack is setup. You can start building your websites now :)

Leave A Comment