Before we jump into the installation and configuration, lets get to an introduction to Jira.
For those who are new to Jira, I would suggest you to go through the below introduction to know what Jira is.
Jira is a Project Management Software used to track bugs and fix issues regarding the project and it is convenient that the software will reduce your paper works and will help you to focus more on the issues and solutions. I believe there are a whole lot of blogs and documentations you can find on the internet regarding the same topic, but I assure you it will take your days when it comes to SSL installation and redirecting using proxy softwares.
Once you have gone through the following documentation, you will realize that it is simple as plucking a flower. In the following documentation, there are steps that include editing configuration files. So, please make sure to backup the files in case you mess up.
Requirements:
- CentOS Operating System
- Fresh installation of Jira with the default ports and other values.
- SSL certificate purchased for the hostname of the server (URL for Jira)
Let’s Jump right into it.
There are some dependencies to make apache work with Jira and redirect the requests. Let’s install them first. I believe you have the root privilege.
-
yum -y install centos-release-scl-rh
-
yum -y install httpd24-httpd
-
yum -y install httpd24-mod_ssl.x86_64
-
yum -y install httpd24-mod_proxy_html.x86_64
Prepare SSL certificates:
Copy SSL certificates to a path in the same server Jira is installed on. I am using Lets Encrypt free SSL to provide the documentation and I generated the certificate files in the following path
Certificate: /etc/letsencrypt/live/jira.iserversupport.com/cert.crt

Private Key: /etc/letsencrypt/live/jira.iserversupport.com/privkey.pem
Once the above installation is finished, we can configure Apache to work with Jira and SSL. The configuration for apache will be located the following location /opt/rh/httpd24/root/etc/httpd/conf.d/jira.conf. Please keep a backup of the file before editing it.
Open the configuration in Linux text editor
vi /opt/rh/httpd24/root/etc/httpd/conf.d/jira.conf
The configuration file will look like below. Modify the ServerName and SSL certificate location according to your server hostname and SSL certificate location.
<VirtualHost *:443 >
ServerName jira.iserversupport.com
ErrorLog /var/www/jira/error.log
CustomLog /var/www/jira/requests.log combined
ProxyRequests Off
# ProxyPreserveHost On
# ProxyVia Off

<Proxy *>
Require all granted
</Proxy>

ProxyPass / http://jira.iserversupport.com:8080/
ProxyPassReverse / http://jira.iserversupport.com:8080/

SSLEngine On
SSLCertificateFile /etc/letsencrypt/live/jira.iserversupport.com/cert.crt
SSLCertificateKeyFile /etc/letsencrypt/live/jira.iserversupport.com/privkey.pem
</VirtualHost>

<VirtualHost *:80>
ServerName jira.iserversupport.com
Redirect Permanent / https://jira.iserversupport.com./
</VirtualHost>

Restart apache
systemctl restart httpd24-httpd
While restarting Apache, you may receive an error regarding the location for the log files not present in the server. You can just create them manually. Then you can restart apache without any issues.
Now, we just need to configure Jira to use the configurations we have done earlier. Jira already have different connectors in the server.xml which is the configuration file for Jira to connect between proxies via http and https. Determining the appropriate connector is the crucial part. The connector we need is already in the configuration, but it is commented out.
Open the configuration file that is located in /opt/atlassian/jira/conf/server.xml in the Linux text editor
vi /opt/atlassian/jira/conf/server.xml
Find the connector that has the title “HTTPS – Proxying Jira via Apache or Nginx over HTTPS”
The connector will look like below.
<!--
<Connector port="8080" relaxedPathChars="[]|" relaxedQueryChars="[]|{}^\`"<>"
maxThreads="150" minSpareThreads="25" connectionTimeout="20000" enableLookups="false"
maxHttpHeaderSize="8192" protocol="HTTP/1.1" useBodyEncodingForURI="true"
acceptCount="100" disableUploadTimeout="true" bindOnInit="false" secure="true" scheme="https"
proxyName="jira.iserversupport.com" proxyPort="443"/>
-->
As you can see the connector is commented out using the tags “<!–” and “–>”. Remove the tags and the connector will be active. You need to make sure the following values are set correctly.
-
scheme = https
-
proxyName : jira.iserversupport.com (Your server hostname)
-
proxyPort = 443
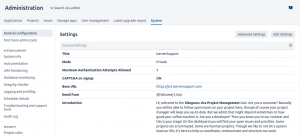
The final step is to configure the base URL for Jira which can be done from Jira dashboard. I have added a screenshot of the settings wizard. You may check it out for reference.
- Login to your Jira dashboard with administrator account
- Find the gear icon in the top right corner near to the profile
- Navigate to System
- Provide the password for user.
- Click on “Edit Settings” option in the top right side of the settings tab
- Change the base URL to https://jira.iserversupport.com (https://server-hostname.com)
- Scroll down and click update and the changes will be saved.
Restart Jira service. You cannot restart Jira directly. You have to stop and start the service manually.
systemctl stop jira
systemctl start jira
That’s it.


Leave A Comment